Tagged: commands Toggle Comment Threads | Keyboard Shortcuts

  • Kartik 9:25 PM on February 6, 2013 Permalink
    Tags: commands, , , , , , , , ,   

    Quickly Check Temperature Values of Hardware Components in Ubuntu 

    So, I missed posting yesterday. Hope this doesn’t repeat.

    Today I am sharing a small bash script I wrote to check the temperatures recorded by various sensors in my laptop. Nothing incredibly smart here, just a quick but useful hack.

    I am one of those unhappy Linux users who suffer from lack of driver support for their hardware. Due to some weird kernel bug or messy graphics driver, which led to incredibly high temperatures on my laptop,  I spent about a year using Linux as a VirtualBox guest in Windows; this was before Ubuntu 12.04 got shipped. During those times, my laptop used to shutdown automatically after reaching critical temperatures (100° C!) on simple tasks like watching a HD video on VLC.

    What all do we need? In *buntu systems, install sensors and hddtemp tools. I am using an ATi Radeon card and proprietary driver ships with a utility for reporting temperature for the same. You can modify the script to work with nVidia cards accordingly.

    sudo apt-get install lm-sensors hddtemp

    Next, you need to run sensors-detect to let sensors identify all the hardware monitoring sensors present in your system.

    sudo sensors-detect

    Press enter to accept default options when asked.

    Here is the script; hddtemp requires sudo making this script more than 3 lines:


    #!/bin/bash
    sensors
    aticonfig –odgt
    answer="N"
    if [ "$(whoami)" != "root" ]; then
    echo -ne "\n\nDo you want to know hard disk temperature (requires sudo)? (y/N) "
    read answer
    if [ "$answer" == "y" ]; then
    {
    sudo hddtemp /dev/sda
    }
    else
    {
    exit 0
    }
    fi
    else
    echo
    sudo hddtemp /dev/sda
    exit 0
    fi

    view raw

    temp.sh

    hosted with ❤ by GitHub

    I have put this script in my local bin folder for quick access. To do the same, follow the steps:

    mkdir ~/bin

    Put this directory in your path by putting the following line at the end of your .bashrc file (replace k4rtik by your username)

    export PATH=$PATH:/home/k4rtik/bin

    mv temp.sh ~/bin/temp

    chmod +x temp

    Now either logout and login or issue the following command to be able to access the script by just entering temp on your terminal.

    source ~/.bashrc

    Here is a sample run from my machine:

    k4rtik: ~ $ temp
    acpitz-virtual-0
    Adapter: Virtual device
    temp1:        +26.8°C  (crit = +127.0°C)
    temp2:        +70.0°C  (crit = +85.0°C)
    
    coretemp-isa-0000
    Adapter: ISA adapter
    Core 0:       +70.0°C  (high = +84.0°C, crit = +100.0°C)
    Core 1:       +70.0°C  (high = +84.0°C, crit = +100.0°C)
    Core 2:       +70.0°C  (high = +84.0°C, crit = +100.0°C)
    Core 3:       +70.0°C  (high = +84.0°C, crit = +100.0°C)
    
    Default Adapter - ATI Mobility Radeon HD 4670
                      Sensor 0: Temperature - 74.50 C
    
    Do you want to know hard disk temperature (requires sudo)? (y/N) y
    [sudo] password for k4rtik: 
    /dev/sda: ST9500420ASG: 51°C

    PS: Didn’t know earlier – embedding Github gists into WordPress is as easy as copy & pasting the URL. 🙂

     
  • Kartik 12:00 AM on July 14, 2012 Permalink
    Tags: commands, , , , , tools, , YouTube   

    Best Tool for Downloading YouTube Videos and Playlists 

    How many times does it happen that you stumble upon an awesome youtube video, you make up your mind to download it but fail short to find a good tool which actually works?

    In this post I want to introduce one of the best tools for downloading videos from YouTube and other video platforms – youtube-dl. This command line tool is basically just a python script released by its developers in public domain and it works on any platform that supports Python 2.x or later including Linux, Windows or Mac OS X.

    If you are on Ubuntu, you can directly install it by using:

    k4rtik: $ sudo apt-get install youtube-dl

    If not, just go to youtube-dl download page and save the script in your home directory. Then make the script executable by using the following command:

    k4rtik: $ chmod +x youtube-dl

    You can also consider moving the script to your /usr/local/bin directory to invoke it directly without specifying the path:

    k4rtik: $ sudo mv youtube-dl /usr/local/bin

    In its most basic form you can use this tool to download the highest quality of video by just supplying the url of the video as its argument, e.g.:


    k4rtik: Videos $ youtube-dl http://www.youtube.com/watch?v=Rk62hRBDLGc
    Setting language
    Rk62hRBDLGc: Downloading video webpage
    Rk62hRBDLGc: Downloading video info webpage
    Rk62hRBDLGc: Extracting video information
    [download] Destination: Rk62hRBDLGc.flv
    [download] 100.0% of 5.38M at 88.81k/s ETA 00:00
    k4rtik: Videos $

    My preferred way of downloading videos is by using the -t flag, which saves the video with the title in the file name, e.g.:


    k4rtik: Videos $ youtube-dl -t http://www.youtube.com/watch?v=Rk62hRBDLGc
    Setting language
    Rk62hRBDLGc: Downloading video webpage
    Rk62hRBDLGc: Downloading video info webpage
    Rk62hRBDLGc: Extracting video information
    [download] Destination: Reasons_to_love_Ubuntu_12_04_LTS-Rk62hRBDLGc.flv
    [download] 100.0% of 5.38M at 204.52k/s ETA 00:00
    k4rtik: Videos $

    In case, you don’t want to download the highest quality to save some bandwidth and time, youtube-dl offers choice of multiple formats. See its man-page to find out more, I prefer H264 videos at 480p size for youtube which I specify like this:


    k4rtik: Videos $ youtube-dl -t -f 18 www.youtube.com/watch?v=02nBaaIoFWU
    Setting language
    02nBaaIoFWU: Downloading video webpage
    02nBaaIoFWU: Downloading video info webpage
    02nBaaIoFWU: Extracting video information
    [download] Multipath_TCP-02nBaaIoFWU.mp4 has already been downloaded
    k4rtik: Videos $

    You can also use it for downloading complete playlists off youtube:

    k4rtik: Videos $ youtube-dl -f 18 -t http://www.youtube.com/watch?v=128ll4yXUfY&list=PL2E1848DB88958935

    Oh, and did I mention… it continues the download if interrupted due to network trouble or some other reason, just specify the same command again.

    According to its man page it supports video downloads from other popular video hosting sites like Facebook, Metacafe, Vimeo, Yahoo!, YouTube, blip.tv, video.google.com and many more. Hope you enjoy using it for all your video downloading needs.

    Ciao

    K4rtik

    This article first appeared at http://www.digimantra.com/tutorials/best-tool-for-downloading-youtube-videos-and-playlists/

     
    • Jishnu 4:44 PM on July 17, 2012 Permalink | Reply

      Here is an alternate browser based solution which I use. http://userscripts.org/scripts/show/25105.

      • Kartik 6:49 PM on July 17, 2012 Permalink | Reply

        Yeah, I had installed that script as well. But sometimes I just prefer putting the terminal on work and consider it more reliable in case of failed downloads. 🙂

    • Vijeenrosh P.E 10:30 PM on September 22, 2012 Permalink | Reply

      I was beginnig to wonder could a play with wget , curl and some shell scripting can make a script like that 🙂

    • Deepak Malani 2:40 PM on November 20, 2012 Permalink | Reply

      Used this. good utility. Wondering if this will need regular updates, as was the case with some earlier youtube downloaders (that I used in Windows). BTW, is youtube okay with people downloading its videos (in its terms & conditions)?

      • Kartik 3:19 PM on November 20, 2012 Permalink | Reply

        This actually gets updated pretty often. The download page currently lists the latest version from October 9 – http://rg3.github.com/youtube-dl/download.html

        My opinion is those are not really Youtube’s videos, they are people’s videos. As long a user doesn’t mind sharing the link of their uploaded video publicly, Youtube shouldn’t exert a problem with downloads. It’s another matter that they want visitors to view videos from their site, so they choose not to provide any explicit download video link. Anyhow, this will slowly change with HTML5 video tag, which comes by default with download video option. 🙂

    • Personal Site 7:33 AM on April 25, 2013 Permalink | Reply

      Hello! I know this is somewhat off topic but I was wondering which blog platform
      are you using for this site? I’m getting fed up of WordPress because I’ve had problems with hackers and I’m looking at alternatives for another platform. I would be fantastic if you could point me in the direction of a good platform.

      • Kartik 9:13 AM on April 25, 2013 Permalink | Reply

        As you can gather from the url of this site, I am using WordPress itself. Haven’t had any problems of attacks, not atleast on wordpress.com hosting. YMMY on self hosting wordpress.

  • Kartik 8:40 AM on February 12, 2012 Permalink
    Tags: commands, , , , , , , , , , ,   

    Control All Computers in a Lab from a Single System 

    Quoting Dhandeep, our super-cool lab-admin:

    now , all 70 systems in the lab can be switched on and switched off by single commands from the hostel…

    Yes, that and a lot more is possible in our Software Systems Lab now. How? Read on…

    The Setup

    We have over 70 systems with Ubuntu 10.04 LTS installed on them. There is an administrative account (let’s call it admin for this post) and a guest (limited privilege) account on each. Needless to say, admin password is known only to admins and guest password is known to all who use the lab. All these systems are configured to be able to controlled remotely (read: OpenSSH server is installed on each).

    Basic Idea

    1. Log in via SSH without a password
    2. Write your desired command and run it in background
    3. Run the above in a loop for the lab’s subnet.

    Detailed Steps

    See Tips for Remote Unix Work (SSH, screen, and VNC) for the first step (and for more immensely useful tips on remote usage of *NIX systems).

    For Step 2, here is one example command:

    ssh -t admin@labsystem "echo  | sudo -S shutdown -h now" &

    In the above command labsystem is usually replaced with an IP address like 192.168.xxx.xxx and the <pass> with the password of the admin account.

    WARNING: it’s not suggested to use the above command out in the open to save the password from prying eyes; also note that for additional security, you need to take a measure to make sure this is not saved in bash history or if the command is in a script, it’s not accessible to others.

    The requirement of ampersand at the end depends on particular usage (if you want to run, let’s say,  uptime command over ssh, you would not want the output to go to background, or you can redirect the output to some file). Putting the process in background, in this case, will help in the next step.

    The -S switch for sudo makes it possible to supply the password via stdin (we had discovered this switch from sudo’s man page, but didn’t manage to conclude “echo pass |” will do the trick until we discovered it at StackOverflow)

    Step 3: use your favorite scripting language (bash, python, etc.) and run the above command for all the systems of your lab subnet. An example in bash:

    for ip in {101..180}
    do
    	ssh -t admin@192.168.xxx.$ip "echo  | sudo -S shutdown -h now" &
    done
    

    The above code snippet will run the desired command for all systems in subnet within the IP range 192.168.xxx.101 to 192.168.xxx.180. Now, you can clearly see how putting the process in the background will help – the next iteration of the loop need not wait for the command in previous iteration to finish!

    In the passing, here’s a small video I shot featuring Dhandeep when he got all excited to see this working:

    That’s it. Try this out, share your tricks and have some *NIX fun in your lab. 🙂

    PS: I have not covered how systems can be switched on with this setup. It basically involves broadcasting a magic packet to the subnet. Hope Dhandeep comes up with a blog post on that soon. 😉 Here it is: On the push of a button..

    Ciao

    Kartik

     
    • firesofmay 8:53 AM on February 12, 2012 Permalink | Reply

      Sweet! I love it! 😉

    • Amarnath 8:54 AM on February 12, 2012 Permalink | Reply

      Interesting. But, I think you forgot to mention the important prerequisite for doing this task. Don’t you need to generate public keys for all machines to be controlled and pass it to the central control node? I believe only this would help in password-less remote login via SSH.

      Indeed Dhandeep seems to be pretty excited about it. 🙂

      Cheers

      Amarnath

      • Kartik 10:03 AM on February 12, 2012 Permalink | Reply

        Thanks for your comment Amarnath.

        Indeed, that is necessary and is mentioned as the first step. But instead of describing the whole process myself I chose to point to a good resource (Tips for Remote UNIX Work…) for that kind of setup. You missed out perhaps. 😉

    • Lokesh Walase 5:41 PM on February 12, 2012 Permalink | Reply

      Awesome !! 🙂

    • Imran 11:04 PM on February 13, 2012 Permalink | Reply

      You can use puppet to design more efficient system which gives you more flexibility in automation

      • Kartik 12:56 AM on February 14, 2012 Permalink | Reply

        Yeah, that’s right. I have that in my to do list to learn soon. 🙂 Though, I am not aware if it works for normal desktop systems too.

  • Kartik 12:00 AM on August 19, 2011 Permalink
    Tags: Apache, commands, , Hosting, , , , ,   

    Configuring Apache for Developing Multiple Websites under Ubuntu Linux 

    Are you a beginner in web development with LAMP environment, or a CS/IT student overwhelmed with setting up LAMP and configuring it for your web-related academic project? If yes, then you are at the right place.

    We have discussed earlier how easy it is to setup a web development environment on your Ubuntu desktop. In this article we will try to have a more customized setup of this environment for easily working with multiple websites. Also find below introduction to some useful Apache utilities and configuration files on Ubuntu/Debian operating system.

    One of the ways to work on multiple sites is to put different directories under /var/www and access them as http://localhost/site1, http://localhost/site2 etc. but there is another and more elegant way. We can access our sites simply by pointing our browsers to http://site1/ and http://site2 etc. To find out how, follow the tutorial.

    Let’s keep all our development websites under the home directory in public_html folder. Apart from being easy to manage your website from inside your home folder, this has the benefit that you no longer need to use sudo to put files in your document root (/var/www earlier).

    Open the Terminal and follow the steps for a test setup, you may customize it your preferences later:

    kartik@PlatiniumLight ~ $ mkdir public_html
    kartik@PlatiniumLight ~ $ cd public_html/
    kartik@PlatiniumLight ~/public_html $ mkdir site1
    kartik@PlatiniumLight ~/public_html $ mkdir site2
    kartik@PlatiniumLight ~/public_html $ 

    Create files called index.html with some content inside each of these directories to help you identify them when you walk through this tutorial:

    kartik@PlatiniumLight ~/public_html $ cd site1
    kartik@PlatiniumLight ~/public_html/site1 $ gedit index.html
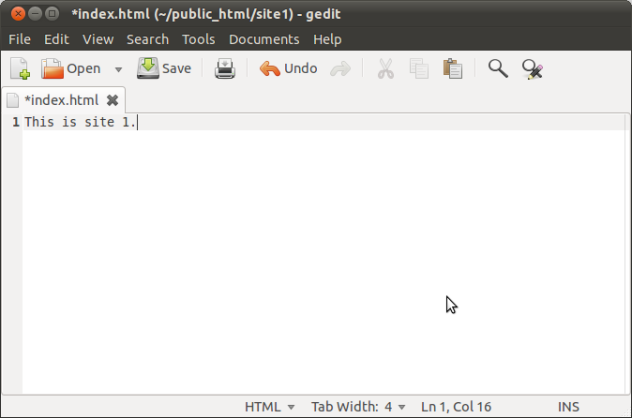
    Screenshot - index.html (~/public_html/site1) - gedit

    Screenshot - index.html (~/public_html/site1) - gedit

    Enter some text such as “This is site 1” and save the file. Similarly put “This is site 2” in the index.html of site2 directory.

    kartik@PlatiniumLight ~/public_html/site1 $ cd ../site2
    kartik@PlatiniumLight ~/public_html/site2 $ gedit index.html
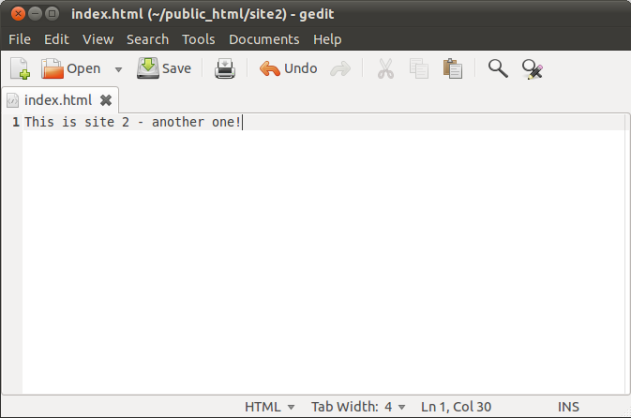
    Screenshot - index.html (~/public_html/site2) - gedit

    Screenshot - index.html (~/public_html/site2) - gedit

    Now begins the main step of the process. We have to create separate apache configuration file for each of the websites. This is fairly easy to do. We copy the default config file and modify it to our needs:

    kartik@PlatiniumLight ~/public_html/site2 $ cd /etc/apache2/sites-available/
    kartik@PlatiniumLight /etc/apache2/sites-available $ sudo cp default site1
    kartik@PlatiniumLight /etc/apache2/sites-available $ sudo cp default site2
    kartik@PlatiniumLight /etc/apache2/sites-available $ sudo vim site1

    Note that I am using vim editor for making the changes as I prefer it for its amazing syntax highlight support even for various linux configuration files, you may use gedit, or any other editor instead.

    We need to change the path of the DocumentRoot and Directory to the particular website’s directory, and add a ServerName directive:

    ServerName site1
    DocumentRoot /home/kartik/public_html/site1
    <Directory /home/kartik/public_html/site1/>

    Take notice of the ‘/’ near the end of the second line, it is important. Also don’t forget to add the line with ServerName directive just before the DocumentRoot directive. The lines which need to be edited are highlighted with red arrows in the following screenshot:
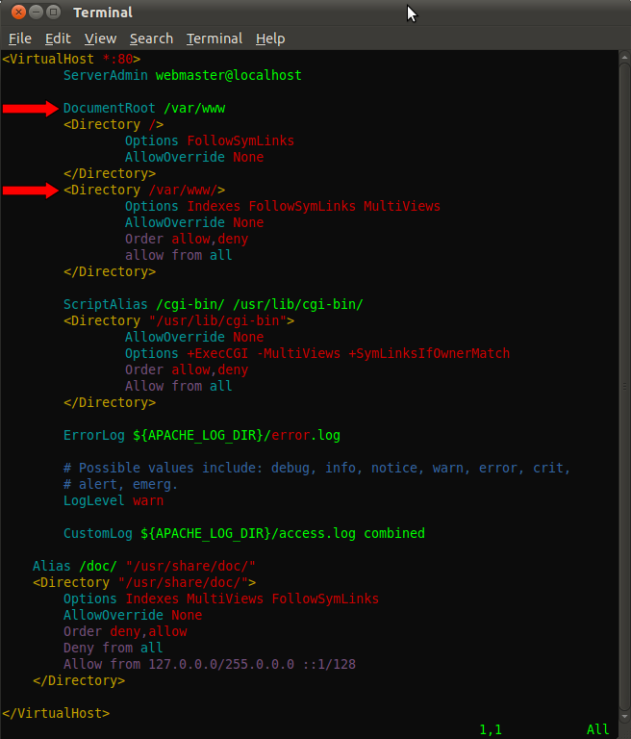
    Screenshot - Terminal - Editing site1 config file

    Screenshot - Terminal - Editing site1 config file

    Save the file, similar changes need to be done for other sites also, site2 in this example.

    Now we need to make entries in the hosts file so that Apache can recognize the new sites.

     kartik@PlatiniumLight ~ $ sudo gedit /etc/hosts

    Add the names of the new sites after localhost as shown:
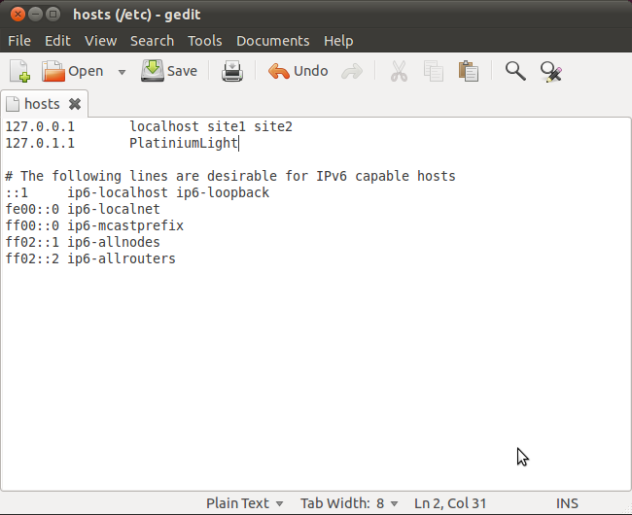
    Screenshot - hosts (/etc) - gedit

    Screenshot - hosts (/etc) - gedit

    Now enable the new websites by using a2ensite command:

    kartik@PlatiniumLight ~ $ sudo a2ensite site1
    Enabling site site1.
    Run '/etc/init.d/apache2 reload' to activate new configuration!
    kartik@PlatiniumLight ~ $ 

    Do similarly for site2, and then run the following command to activate the new configuration:

    kartik@PlatiniumLight ~ $ sudo service apache2 reload
    * Reloading web server config apache2
    apache2: Could not reliably determine the server's fully qualified domain name, using 127.0.1.1 for ServerName
    [ OK ]
    kartik@PlatiniumLight ~ $ 

    You can ignore the warning which is shown in the above output. Now open your favorite browser and open http://site1 and http://site2 in different tabs, you will find the content of their respective index.html files.
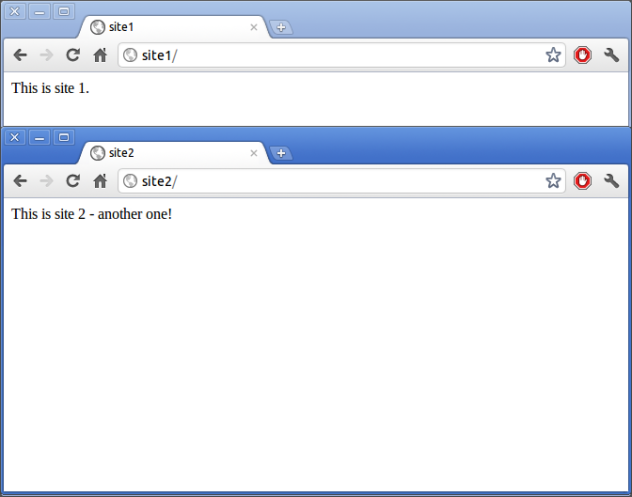
    Screenshot - Chromium showing both the sites

    Screenshot - Chromium showing both the sites

    And now you are done with setting up multiple sites in Apache. You can create as many sites as desired by following the same procedure, creating a config file for each website.

    Here follows an introduction to some useful Apache utilities and configuration files which aid you in this kind of a setup:

    a2ensite – As we used this above, you already know what it does – enable a website among those available under /etc/apache2/sites-available directory.

    a2dissite – does exactly the opposite – disable a website so that it is no longer accessible from your web server. E.g.

    kartik@PlatiniumLight ~ $ sudo a2dissite site2
    [sudo] password for kartik:
    Site site2 disabled.
    Run '/etc/init.d/apache2 reload' to activate new configuration!
    kartik@PlatiniumLight ~ $ sudo service apache2 reload
    * Reloading web server config apache2
    apache2: Could not reliably determine the server's fully qualified domain name, using 127.0.1.1 for ServerName
    [ OK ]
    kartik@PlatiniumLight ~ $ 

    This will disable site2 from loading any more. You can use a2ensite to enable it again.

    Similar to sites, there are corresponding directories and commands for controlling apache modules also. Available modules are kept under /etc/apache2/mods-available directory and enabled ones are symlinked under mods-enabled directory. The corresponding commands are – a2enmod and a2dismod. E.g.

    kartik@PlatiniumLight /etc/apache2/conf.d $ sudo a2enmod rewrite
    Enabling module rewrite.
    Run '/etc/init.d/apache2 restart' to activate new configuration!
    kartik@PlatiniumLight /etc/apache2/conf.d $ sudo service apache2 reload
    * Reloading web server config apache2
    apache2: Could not reliably determine the server's fully qualified domain name, using 127.0.1.1 for ServerName
    [ OK ]
    kartik@PlatiniumLight /etc/apache2/conf.d $ 

    This will enable Apache rewrite module which is required my some CMS solutions like Drupal to enable pretty URLs.

    Hope this article was useful to you, feel free to ask your doubts, problems you face, or any similar tips you might have through comments.

    An edited version of this article first appeared at http://www.muktware.com/articles/1876

     
    • Ershad K 10:30 PM on August 19, 2011 Permalink | Reply

      Informative post, nicely written 🙂

    • Abhimanyu M A 11:34 AM on August 22, 2011 Permalink | Reply

      Hey think last time i tried it in Hostel LAN i was able to perform a MiM attack, people trying out http://site1/ got to my site if it resulted in no actual site being there , and [not sure about this] even when the other site took a bit long to respond

      • dhandeep 10:07 PM on August 22, 2011 Permalink | Reply

        exactly.. u need to work a lot for setting up the backend to fake sites and get the whole control of the lan data… 🙂 😉 .. well u can even setup a plugin that rediercts to actual site if that site is not on ur comp.. (this ll eliminate the chance of ppl suspecting u.)

      • Kartik 10:28 PM on August 22, 2011 Permalink | Reply

        It might have been a problem of incorrectly configured DNS entries in the hosts file. Please elaborate your scenario more, I am unable to understand the situation clearly.

    • sorbh_teke 5:28 PM on September 12, 2012 Permalink | Reply

      What configuration need to do in order to make all these sites available through internet ??

      • Kartik 8:07 PM on September 12, 2012 Permalink | Reply

        From Apache’s side everything is ready. Additionally, you need to configure your DNS servers to point these new ‘names’ to your server.

    • Miquel 12:52 AM on September 28, 2012 Permalink | Reply

      Hi Kartik. I know it’s an old post, but I’ve configured my sites the same way as you.
      But now I have a problem with mod_rewrite. One of my sites is a Joomla 2.5 site with SEF and URL rewriting enabled (site1).
      When I pint to http://site1 I get redirected to http://site1/en (its a multilingual site, it’s ok).
      But when I access any other site, for instance http://site2, I get redirected to http://site2/es and the contents of site1 are being shown.
      Whats happening? Can coexist more than one site, one with URL rewriting and another without it?
      Kind regards

      • Kartik 9:45 AM on September 28, 2012 Permalink | Reply

        Interesting.

        Looks like your rewrite rules are in the wrong place. If you put them in .htaccess of site1 (instead of putting in apache’s config file) and access site2, I doubt it will ever redirect again to site1’s contents.

        Let me know, if this solved your problem.

    • miquel 11:38 PM on October 3, 2012 Permalink | Reply

      Thanks Kartik. I reviewed all the process and I have some sites with ServerName and some others without it, and maybe this was the error. Now it works fine, great!

    • edo 8:16 AM on February 8, 2013 Permalink | Reply

      Nice post guy. It’s realy help me. Thanks

    • Bharat 11:32 AM on October 3, 2013 Permalink | Reply

      Hey there Kartik Buddy,

      This requires and addition of a tag

      “ServerName site1”

      in sites-enabled/site1

      To make it perfectly work !

      Rest is cool 😉

      • Kartik 12:35 PM on October 3, 2013 Permalink | Reply

        You are right. But is it absolutely necessary? I have tried this setup without ServerName directive and it works completely fine.

        • Bharat 6:23 PM on October 3, 2013 Permalink

          yeah but in my case (ubuntu 12.04) it keeps on redirecting me to index.html of /var/www withdout this !

        • Kartik 7:45 PM on October 3, 2013 Permalink

          Bharat, I just checked my post again, ServerName directive was always there (with extra warning about including it, see just above the screenshot), just that the screenshot doesn’t contain it. 🙂

  • Kartik 10:11 PM on July 14, 2011 Permalink
    Tags: commands, , ,   

    Remove Orphaned Actions in Drupal 7 

    I recently discovered this weird behaviour by drush when I disabled Comment module in Drupal 7 – drush was giving the following warning whenever I tried enabling/disabling any module:

    WD actions: 3 orphaned actions (comment_publish_action, comment_save_action, comment_unpublish_action) exist in the actions table. Remove orphaned actions

    After some scrounging on drupal.org (where most solutions were meant for Drupal 6), I found the solution at http://blog.devkinetic.com/node/9 Just execute the following once:

    drush php-eval "actions_synchronize(actions_list(), TRUE);"
     
    • Max Nylin 11:53 AM on August 17, 2011 Permalink | Reply

      Thank you for spreading this, just what I was looking for.

      / Max

    • Kyle 8:15 PM on August 19, 2011 Permalink | Reply

      Yea, this bites me every once in a while, and going to the “orphans” URL doesn’t always work. This works great! Thanks.

      • Kartik 8:48 PM on August 19, 2011 Permalink | Reply

        That ‘orphans’ url method is meant for Drupal 6 only.

        Thanks for your comment. 🙂

  • Kartik 12:00 AM on July 9, 2011 Permalink
    Tags: commands, , , , , Joomla, , , MySQL, , ,   

    Easiest Way to Setup a Web Development Environment on Ubuntu-based Distros 

    Did you know how easy it is to get a basic web development environment on your Ubuntu-based Linux distribution? Guess what, it just takes 2 commands on the Terminal:

    sudo apt-get install tasksel

    This will install a small utility which lets you install a lot packages grouped together as software collections.

    sudo tasksel

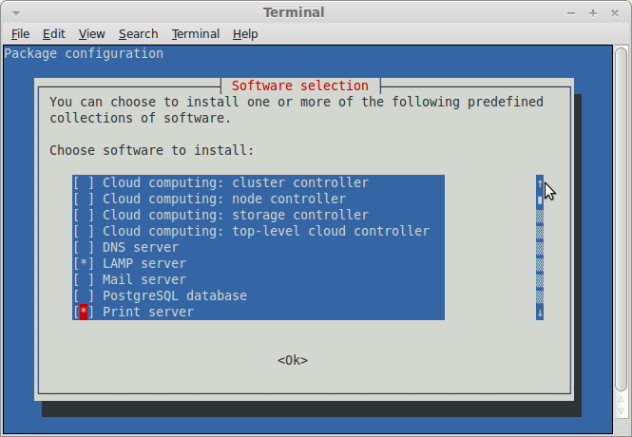
    Launch tasksel and select ‘LAMP server‘ by pressing the SPACE key, press ENTER when you are done (see attached screenshot). It will take some time for the required packages to download and install. Near the end of setup, the installer will ask you to create a password for MySQL‘s root user.

    Select LAMP Server among the choices in Tasksel

    Select LAMP Server among the choices in Tasksel

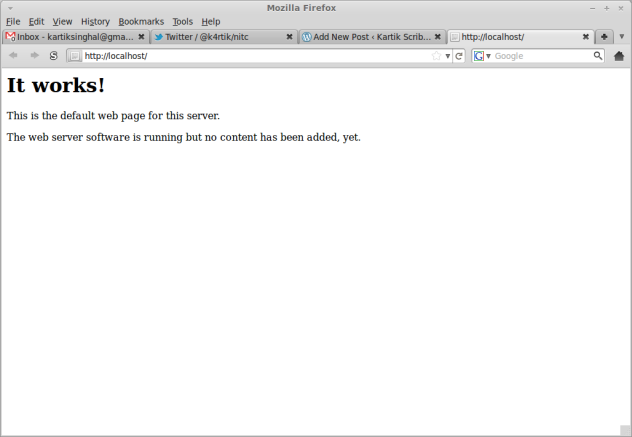
    After the installer finishes, you have the environment ready. Head over to your favorite browser and open http://localhost If everything went fine, the page will say It works!

    It works!

    It works!

    Now you can start creating websites by putting your html, php, etc. files under /var/www directory or just choose to go with CMS solutions like Drupal, WordPress or Joomla.

    The author also recommends to install phpmyadmin package if you happen to work with MySQL databases.

    An edited version of this article first appeared at http://www.muktware.com/articles/08/2011/1348

     
  • Kartik 12:00 AM on June 30, 2011 Permalink
    Tags: Bluetooth, commands, Data Communications, , , , , , , Smartphone, , , Wi-Fi, Wireless, Wireless LAN,   

    Use rfkill to Enable/Disable Wireless on your Linux Laptop 

    This notebook computer is connected to a wirel...

    This notebook computer is connected to a wireless access point using a PC card wireless card. (Photo credit: Wikipedia)

    Imagine a situation when you have to book an air/train ticket in a jiffy, or check an important mail quickly and the only option you have is a wi-fi connection from either your smart phone or surroundings, and you have only some Linux variant installed on your system. And even after installing all the necessary drivers, you are unable to get the wi-fi on your laptop working? Frustrating right? If yes, then you might want to read on about this useful utility called rfkill which you can keep in handy for those weary situations.

    I own a Dell Studio XPS 1645 and have always found it cumbersome to get the wi-fi working on my system, mainly during those geek/hacker meetups, the only times I have to use wireless Internet. I remember randomly switching wireless on and off through the hardware switch and rebooting my system multiple times in order to get it working. Well, this was the situation until I discovered rfkill – a tool for enabling and disabling wireless devices including Wireless LAN, Bluetooth, etc. Here follows a tutorial on how to use it (fire up the Terminal before proceeding):

    rfkill’s list command lets you see all the available devices, if you don’t find any of your devices, make sure you have turned the hardware switch ON and have installed the drivers for each. Here is what I get on my system after enabling the hardware switch:

    kartik@PlatiniumLight ~ $ rfkill list
    0: brcmwl-0: Wireless LAN
    Soft blocked: yes
    Hard blocked: no
    1: dell-wifi: Wireless LAN
    Soft blocked: yes
    Hard blocked: no
    2: dell-wwan: Wireless WAN
    Soft blocked: yes
    Hard blocked: yes
    3: hci0: Bluetooth
    Soft blocked: no
    Hard blocked: no
    kartik@PlatiniumLight ~ $

    Apart from Bluetooth, I usually find all other devices to be in a random state of yes or no. To enable them, issue the unblock command as shown:

    kartik@PlatiniumLight ~ $ rfkill unblock 0
    kartik@PlatiniumLight ~ $ rfkill unblock 1
    kartik@PlatiniumLight ~ $ rfkill unblock 2
    kartik@PlatiniumLight ~ $ rfkill list
    0: brcmwl-0: Wireless LAN
    Soft blocked: no
    Hard blocked: yes
    1: dell-wifi: Wireless LAN
    Soft blocked: no
    Hard blocked: no
    2: dell-wwan: Wireless WAN
    Soft blocked: no
    Hard blocked: no
    3: hci0: Bluetooth
    Soft blocked: no
    Hard blocked: no
    kartik@PlatiniumLight ~ $

    You can also try using the unblock all command for enabling all the devices together:

    kartik@PlatiniumLight ~ $ rfkill unblock all

    Sometimes it happens that even after unblocking once, some device(s) may show up as blocked (see the 0th device above, which shows hard blocked as yes). To correct this just issue the unblock command again for that particular device:

    kartik@PlatiniumLight ~ $ rfkill unblock 0
    kartik@PlatiniumLight ~ $ rfkill list
    0: brcmwl-0: Wireless LAN
    Soft blocked: no
    Hard blocked: no
    1: dell-wifi: Wireless LAN
    Soft blocked: no
    Hard blocked: no
    2: dell-wwan: Wireless WAN
    Soft blocked: no
    Hard blocked: no
    3: hci0: Bluetooth
    Soft blocked: no
    Hard blocked: no
    kartik@PlatiniumLight ~ $

    When you get all the devices unblocked, you will not face any trouble connecting to wi-fi devices around. 🙂

    Bonus Tip: If you have a common hardware switch for wireless radios, you can turn off additional devices like Bluetooth (or vice versa) to save some battery life using the block command of rfkill:

    kartik@PlatiniumLight ~ $ rfkill block 3
    kartik@PlatiniumLight ~ $ rfkill list
    0: dell-wifi: Wireless LAN
    Soft blocked: no
    Hard blocked: no
    1: dell-wwan: Wireless WAN
    Soft blocked: no
    Hard blocked: no
    2: brcmwl-0: Wireless LAN
    Soft blocked: no
    Hard blocked: no
    3: hci0: Bluetooth
    Soft blocked: yes
    Hard blocked: no
    kartik@PlatiniumLight ~ $

    Stay Dignified!

    • Kartik

    Originally published at http://www.digimantra.com/linux/rfkill-enabledisable-wireless-linux-laptop/

     
  • Kartik 12:00 AM on June 26, 2011 Permalink
    Tags: boot, commands, , , , , Microsoft Windows, Mount (Unix), Sudo, , ,   

    Restore GRUB in Ubuntu after installing Windows 

    So, you had Ubuntu (or any of its derivative) installed on your system and then decided to install Windowswith it? And after installing Windows, you can’t load Ubuntu again, just follow the steps to get this working:

    1. Boot the system using a Ubuntu Live disk.
    2. After you reach the desktop, open Terminal (press Alt+F2, type “gnome-terminal” without quotes and press enter).
    3. Execute:
      sudo fdisk -l
    4. Execute (after replacing sda7 with your corresponding linux root partition, which you will be able to identify from the output of the previous command – it’s usually marked as Linux):
      sudo mount /dev/sda7 /mnt
    5. Just check whether you got the root partition right, if you have more than 1 linux partition on your hard disk:
      cd /mnt
      ls

      If the listing contains names like bin, boot, dev, etc, home, tmp, usr, var, et cetera then you are in the right partition. If not, unmount this using:

      sudo umount /mnt

      and follow the above step again using another partition.

    6. Now:
      sudo grub-install --root-directory=/mnt /dev/sda

      and grub will get installed if it shows no errors.

    7. As a last step unmount your /mnt directory using:
      sudo umount /mnt

      and restart the system. You will find the friendly grub boot manager giving you the choice to boot into Linux or Windows.

    An edited version of this post first appeared at http://www.digimantra.com/linux/restore-grub-in-ubuntu-after-installing-windows/


    Kartik – The TechGlider Guy
    http://www.techglider.in

     
  • Kartik 3:48 PM on February 10, 2011 Permalink
    Tags: commands, , , ,   

    Input/Output using Text Files Without Diving into File Handling 

    It’s quite easy to use text files as input source or to redirect the output of programs to files if you happen to do programming on a unix/linux terminal.

    Let’s take an example of a usual random number generator:

    // random.c
    #include <stdio.h>
    #include <stdlib.h>
    int main ()
    {
            int i, count=99999999;
            for (i = 0; i < count; i += 1)
                    printf("%d\n", (int)random());
    
            return 0;
    }
    

    Let’s generate an executable by the name random.out for this program:

    gcc random.c -o random.out

    Then, to redirect it’s output we can use output redirection offered by the bash shell (tip: reduce the value of count in the code above if you don’t want to generate a 1 GiB file and waste both time and disk space):

    ./random.out > randout.txt

    The > (greater than symbol) redirects the standard output to the file named randout.txt.

    To use a file as input source, the < (less than symbol) is used, e.g.:
    ./quicksort.out < randout.txt

    You can also combine both redirections:
    ./quicksort.out < randout.txt > sortedfile.txt

    Another nifty concept is pipelining (or piping), which can be used to redirect output from a program as input of another, for example, to generate random numbers on fly and feed them to my quicksort program I can do:
    ./random.out | ./quicksort.out > sortedfile.txt

    In the above, input source files is not specified as required number of inputs are taken directly from random program. | (vertical pipeline symbol) enables this functionality.

    The program which you create for using these text files should just be able to receive the input and return the output separated by newline characters. Using a for loop for taking definite number of inputs is preferred.

    See also: Redirection on Wikipedia

    Don’t hesitate to leave a comment if this post helped you.

    EDIT (2011-02-24): Got into trouble while using this method for taking input in my DSA lab last week. Apparently this works only if the for loop for taking input does just that – input iteratively in an array – and nothing else. While calling insert function in a binary search tree implementation along with the scanf inside the input loop lead to weird input to the program. File handling seems to be the only solution in this situation. Though if you find any explanation for this behavior of bash shell, please do share in the comments.

     
    • K Dinesh 7:08 AM on February 17, 2011 Permalink | Reply

      Hi there !

      You can as well do this without writing a C program. There is a variable called RANDOM defined in bash enviornment that gives you random numbers between 0 and 32767. This variable keeps changing.

      So just a shell script that for loop doing echo $RANDOM can be used instead of the C program.

      Enjoying your posts. Keep posting. 🙂

    • Kartik 6:50 PM on February 19, 2011 Permalink | Reply

      Thanks a lot for posting your comment Dinesh. 🙂

      I will surely give a try to the method you suggested. However, it is limited to a small range of numbers, and in my case I was trying to play with over a million numbers.

      • K Dinesh 7:16 AM on February 27, 2011 Permalink | Reply

        Once you have a random source you can create any range of random numbers. For eg: you can do
        expr $RANDOM \* $RANDOM.

        • Kartik 8:38 AM on February 27, 2011 Permalink

          Wow! That’s nifty. Thanks for the tip. 🙂

  • Kartik 6:50 AM on February 1, 2011 Permalink
    Tags: commands, , , , ,   

    Accessing NIT Calicut’s Ubuntu Mirror (in the campus) 

    As the FOSSCell webserver has been facing troubles these days, the instructions to use the Ubuntu Mirror of NIT Calicut that were available on the FOSSCell wiki are being missed by many. Here they are though not in the informative way as were given on the wiki:

    Add the following to your /etc/apt/sources.list and comment out other similar repos.


    deb http://192.168.40.97/ubuntu lucid-updates main multiverse restricted universe
    deb http://192.168.40.97/ubuntu lucid-security main multiverse restricted universe
    deb http://192.168.40.97/ubuntu lucid main multiverse restricted universe

    Then update the repo database using:
    sudo apt-get update

     
c
Compose new post
j
Next post/Next comment
k
Previous post/Previous comment
r
Reply
e
Edit
o
Show/Hide comments
t
Go to top
l
Go to login
h
Show/Hide help
shift + esc
Cancel